To optimize a website for search engines, various optimizations must be implemented. Image optimization is an important aspect of this process, as it allows the website to rank in image searches and attract visitors. It’s important to remember that both the desktop and mobile versions of the website need to be optimized for images. This process, known as web image optimization, involves making the images user-friendly and search engine friendly.
This is a long and relatively painful process but needs to be done. Let’s look at the steps that need to be done together.
How to optimize images to rank higher
Perfectly scaled images:
Optimizing the images on your website is crucial for both user experience and search engine ranking. Large, unoptimized images can slow down your website and affect its performance, so it’s important to find the right balance between image quality and size. Tools like Photoshop and Paint can help you scale your images to the appropriate dimensions, but image optimization goes beyond just resizing. To fully optimize your images for the web, you should also consider factors such as file format, alt text, and image name. By following best practices for image optimization, you can improve your website’s speed and performance, and enhance its visibility in search engines.
File size:
In addition to scaling, there are other important considerations for optimizing images for the web. One of these is resolution, which refers to the number of pixels displayed per inch. For web images, a resolution of 72 pixels per inch is a common standard, as it provides good quality for small images. However, every project is unique and some websites may require higher-resolution images. In these cases, it can be helpful to use thumbnails to ensure that the images are properly optimized for the web.
Other factors that affect file size are called “quality” if using JPG and “file size” if using PNG.
File format:
When it comes to optimizing images for the web, the choice of file type can make a big difference in terms of quality and performance. The most common file types for web images are JPG/JPEG, PNG, and GIF, each of which has its own specific uses.
- I recommend using JPG for most of your images. JPG is a versatile file type that is well-suited for most images. It supports a range of quality levels, from low to high, and is often saved as JPEG for higher-quality images. For most of my images, I use a quality level of 70%-50%.
- PNG is another common file type for web images and is particularly useful for transparent or partially transparent backgrounds, which are not supported by JPG. PNG images can be saved as 8-bit to reduce the file size by up to 70%.
- GIF is similar to PNG in that it supports transparent backgrounds, but it has a smaller color range and is best suited for small animations and icons.
- WebP is a Google-developed image format that offers better compression than JPEG and PNG. As a result, WebP images tend to be smaller in file size, which can improve website loading speed and enhance the user experience. WebP supports both lossy and lossless compression and can be used for a variety of image types, including photographs, graphics, and animations. In addition, WebP supports transparency, making it a versatile choice for many different types of images. To use WebP images on your website, you can configure your server to serve WebP images to compatible browsers or use a CDN or plugin to automatically serve WebP images and fall back to other formats for non-compatible browsers.
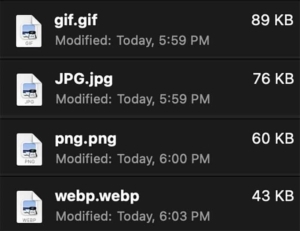
See the size differences for different image file formats with this comparison using the same sample image. Note that results may vary depending on the specific image being used.

Unique images:
Optimizing images for the web involves more than just adjusting their size and resolution. It’s also important to consider how your images can impact your website’s search engine optimization (SEO). Unique, original images can help improve your website’s ranking, as search engines tend to prioritize websites with fresh, high-quality content. On the other hand, using copied or duplicate content, including images, can result in your website being blacklisted or removed from search results. To avoid this, it’s crucial to use only original, licensed images on your website and to properly attribute any images that are used from other sources.
Looking for free images for your website or project? Here are a few options to consider:
- Ask the content creator for permission to use their image. This is the most ethical option, as long as you respect their terms and conditions.
- Sign up for a paid membership with a stock photo website. This can be a cost-effective option if you plan on using a lot of images.
- Use a free image source like pxhere.com. Pxhere is a great resource for high-quality, royalty-free images. Just be sure to check the licensing terms before using any images for commercial purposes.
When using images from any source, it’s important to properly size and scale them before uploading them to your website or project. This will help ensure that they look good and load quickly.
Alt-text:
The alt text of an image is a crucial element of image optimization, as it helps search engines understand the content and context of the image. When a search engine crawls a webpage, it looks for the alt text to identify and index the image. In addition to being important for SEO, alt text is also displayed in the image box if the image cannot be displayed, providing a brief description of the image to users. It’s important to ensure that your image alt text is descriptive, relevant to the content of the page, and optimized for the target keywords.
Image title:
Image titles are an important aspect of image optimization, as they provide a helpful tool for users and also have accessibility benefits. When a mouse hovers over an image with a title, a small text pop-up appears, providing a brief description of the image. This is also useful for people with disabilities, as screen readers can read the image title aloud to those with poor or no vision. If you are publishing a website in the USA, it’s important to consider the Americans with Disabilities Act (ADA) and ensure that your website is accessible to all users. When creating image titles, aim to be as clear and concise as possible, providing a clear explanation of what is depicted in the image.
Now, you know what you are dealing with. If you want to get more information about Image Optimization, you can always MESSAGE US to get your website images checked.


